
Guide to Design Wall Stencils: Creative Ideas for 2026 Decor
Imagine turning a plain wall into a captivating feature that reflects your unique taste. With the right approach to design wall stencils, you can achieve a custom, high-end look without the expense of wallpaper or murals.
This guide will simplify the process of using design wall stencils, offering practical steps, expert tips, and creative inspiration for modern home decor in 2026. Whether you want subtle accents or dramatic transformations, you will discover how to select materials, follow the latest trends, and apply stencils with confidence.
Ready to bring personality and style to every room? Let’s begin.
Understanding Wall Stencils: Basics and Benefits
Transforming your space with creative flair begins when you design wall stencils that reflect your style. Wall stencils have become an essential tool for modern decorators looking to balance creativity, affordability, and flexibility. This section explores what wall stencils are, their key advantages, the materials and tools needed, and the hottest trends shaping 2026 interiors.
What Are Wall Stencils?
When you design wall stencils, you use reusable templates made from durable materials like mylar or plastic to apply paint in precise patterns on your walls. Stenciling is a technique with roots in ancient Egypt and Asia, but it became especially popular in Victorian-era homes for adding decorative flourishes.
Unlike wallpaper or decals, wall stencils let you create custom designs directly on the surface, offering more flexibility and personalization. There are several types to suit different needs:
- All-over stencils: Cover large areas with repeating patterns.
- Border stencils: Add detail along edges or ceilings.
- Motif stencils: Highlight small, individual images.
- Mural stencils: Help create large, artistic scenes.
Common examples include geometric, floral, damask, and custom designs tailored to your unique vision.
Key Benefits of Using Wall Stencils
Choosing to design wall stencils for your home delivers a range of benefits. First, stencils are a cost-effective alternative to wallpaper or hand-painted murals, letting you refresh a room without a hefty price tag. Their reusable nature makes them eco-friendly, and you can easily update or change the design as trends shift.
Wall stencils offer unmatched customization. You can pick patterns, colors, and placements that match your personality and existing decor. For renters, they are ideal because any stenciled design can be painted over when moving out, leaving the wall as good as new.
With the ability to adapt designs seasonally or for special occasions, wall stencils empower you to create a space that evolves with your lifestyle.
Common Materials and Tools for Stenciling
To design wall stencils successfully, you need the right materials and tools. Stencil templates are typically made from mylar, plastic, or adhesive-backed sheets for easy application and durability. Paint options include acrylic, latex, chalk, or specialty stencil cremes, each offering different finishes and ease of use.
Below is a table summarizing essential materials and paint types:
| Material | Description | Best Use |
|---|---|---|
| Mylar | Flexible, reusable, easy clean | Most wall projects |
| Plastic | Sturdy, reusable | Large motifs, murals |
| Adhesive-backed | Sticks to wall, less shifting | Intricate small designs |
Essential tools include stencil brushes, foam rollers, painter’s tape, and a level for precise alignment. Optional supplies such as spray adhesive, sponges, or detail brushes help with more complex patterns. Always clean stencils promptly after use to maintain their shape and longevity.
Wall Stencil Trends: What’s Hot in 2026
As you design wall stencils for 2026, pay attention to the latest patterns and palettes. Geometric and biophilic (nature-inspired) motifs are leading the way, with earthy tones, bold contrasts, and metallics dominating color choices. Art Deco, Scandinavian, tropical foliage, and abstract shapes are especially popular.
Both maximalism and minimalism are influencing stencil design—think dramatic, layered patterns or subtle, refined accents. For inspiration, Scandinavian geometric and palm leaf stencils are being featured in many 2026 collections. You can explore more geometric prints for modern walls to spark your creativity and stay ahead of the trends.
By keeping up with these emerging motifs, you ensure your stenciled walls are both stylish and timeless.
Planning Your Wall Stencil Project
Transforming your space with creative patterns starts long before the paint hits the wall. Thoughtful planning is the key to achieving professional results when you design wall stencils for your home. By focusing on design, color, surface preparation, and workspace setup, you will lay the foundation for a stunning, durable finish.

Choosing the Right Stencil Design for Your Space
Start your project by evaluating the room where you want to design wall stencils. Consider the wall size, ceiling height, and how much natural light the space receives. Large, open areas can handle bold, oversized patterns, while smaller or dim rooms benefit from subtle, airy designs.
Think about the existing decor style. For example, damask stencils add elegance to classic interiors, while mud cloth or geometric patterns suit boho or modern spaces. Match the stencil’s scale to the wall’s dimensions, and let the room’s function guide your choice. A playful motif works well in a nursery, while a refined pattern elevates a dining area.
Browse trending collections for inspiration, and do not hesitate to create a mood board to visualize how you will design wall stencils that fit your vision.
Selecting Colors and Paints for Maximum Impact
Choosing the right paint colors is just as important as picking your stencil design. When you design wall stencils, select hues that either complement or boldly contrast your wall’s base color. Use color psychology to set the mood: soft pastels create a calming bedroom, while vibrant black and white add energy to a kitchen.
Consider current trends for 2026, such as earthy greens, metallic golds, and dramatic contrasts. Specialty finishes like metallic or chalk paints can give your design wall stencils a unique, on-trend look.
Always test paint swatches in your space before committing. The right color combination will enhance your stencil pattern and bring your design vision to life.
Preparing Your Wall Surface for Stenciling
A smooth, clean wall is essential for crisp lines when you design wall stencils. Begin by washing the wall to remove dust and grease. Fill any holes or cracks, then sand rough spots for a flawless finish.
Apply a primer and a base coat of paint that matches your desired background color. Use a level or measuring tape to mark light guides on the wall, ensuring your stencil stays straight. Protect adjacent surfaces like floors, trim, and outlets with painter’s tape and drop cloths.
This careful preparation guarantees that your design wall stencils adhere well and look polished from every angle.
Gathering Materials and Setting Up Your Workspace
Before you start to design wall stencils, gather all necessary tools and supplies. Your checklist should include:
- Stencils (mylar or plastic)
- Acrylic or latex paints
- Stencil brushes and rollers
- Painter’s tape and drop cloths
- Level, measuring tape, and pencil
- Spray adhesive (optional)
- Cleaning supplies
Organize your workspace for efficiency, with good lighting and ventilation. Set up a practice board to test your technique and color choices. Estimate your time commitment so you can plan breaks and avoid rushing. For an in-depth supply list and stepwise approach, consult the DIY Wall Paint Stencils Guide before you begin.
By preparing thoughtfully, you will be ready to design wall stencils that reflect your style and stand the test of time.
Step-by-Step Guide: How to Design and Apply Wall Stencils
Transforming your space with wall stencils is easier than you might think. This step-by-step guide covers everything you need to know to design wall stencils and apply them with professional results. Follow these eight steps to ensure your project is both creative and successful.
Step 1: Planning Your Layout and Marking the Wall
Before you design wall stencils for your room, measure the entire wall area you wish to transform. Use a tape measure and mark the boundaries where the stencil pattern will begin and end.
Employ a level or laser to ensure your lines are perfectly straight. Registration marks are essential for aligning repeating patterns, so lightly mark these with a pencil.
Plan your layout carefully, taking note of obstacles like windows, outlets, or built-in shelving. For a compelling look, center a focal motif above a bed, sofa, or dining table. A well-organized plan is the foundation for a flawless stencil project.
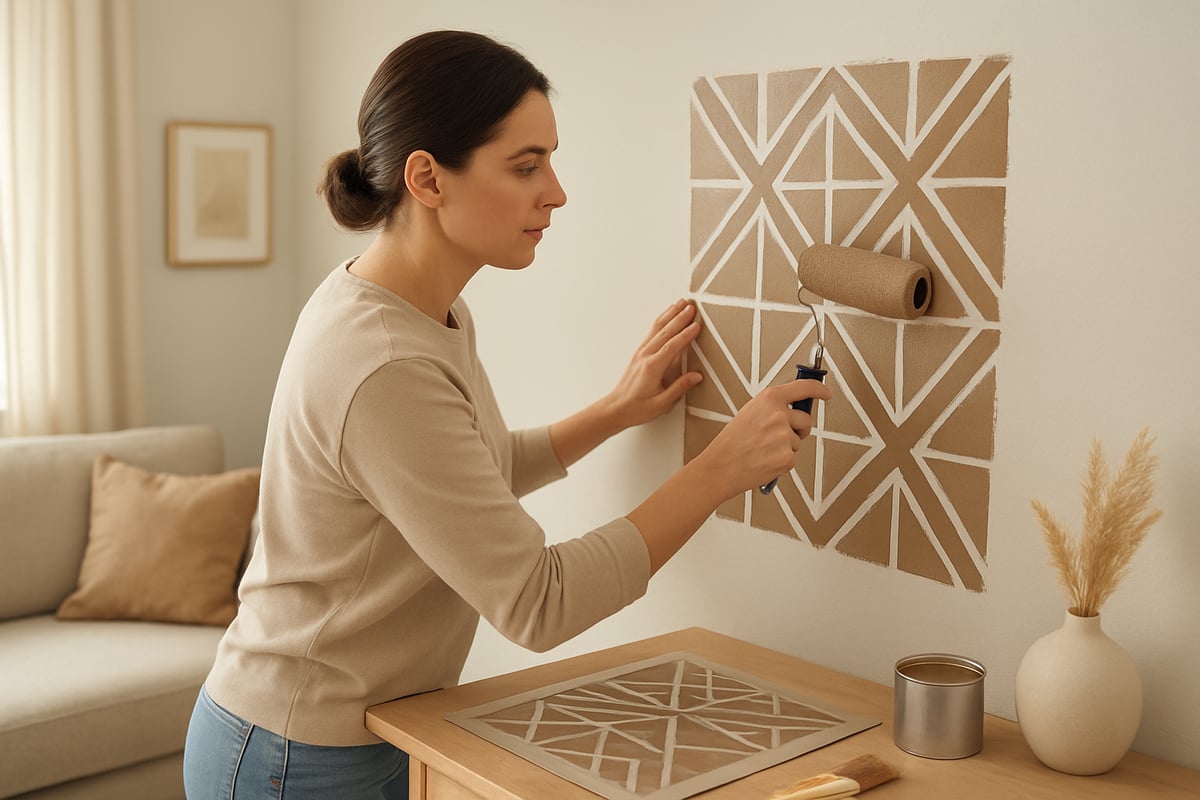
Step 2: Securing the Stencil and Preventing Bleed
When you design wall stencils, securing the stencil properly is critical. Use painter’s tape to affix the stencil to the wall, or spray a light adhesive for extra hold. This minimizes movement and helps prevent paint from seeping under the edges.
For crisp results, ensure the stencil is in full contact with the wall, especially around corners and textured surfaces. Adjust the stencil as needed for edges and tight spaces, using smaller pieces of tape for quick repositioning.
If you are stenciling near ceilings or baseboards, take extra care to anchor the stencil securely. This attention to detail will help you achieve clean lines and professional-quality finishes.
Step 3: Applying Paint with Professional Results
When you design wall stencils, less paint is more. Dip a stencil brush or foam roller into your paint, then dab off excess onto a paper towel. Apply paint in light, even layers, using a gentle dabbing or rolling motion to avoid drips and bleeding.
For multi-color effects, use separate brushes for each shade and allow each layer to dry before applying the next. Experiment with ombre shading or metallic accents for extra depth. If you want more detailed painting guidance, check out this How to Paint Stencils on Walls resource for expert tips.
Practice on a test board before working on your wall, and remember: patience yields the best results.
Step 4: Repeating the Pattern and Handling Corners
To design wall stencils that look seamless, line up your stencil with the registration marks created earlier. Overlap the stencil edges slightly to ensure pattern continuity, especially with geometric or repeating motifs.
When working into corners or near ceilings, gently bend the stencil or use a smaller, cut-down version for tight spots. For uneven surfaces, adjust the pressure and paint application to maintain a consistent look.
Wrapping geometric or floral stencils around an entire room creates a cohesive, immersive effect. Take your time with alignment for a flawless finish.
Step 5: Removing the Stencil and Touching Up
After you design wall stencils and finish a section, peel the stencil away slowly and carefully to avoid smudging wet paint. Address any minor bleeds or imperfections with a small artist’s brush and your base wall color.
Allow each painted section to dry fully before repositioning the stencil for the next repeat. Clean the stencil between uses to keep your edges sharp and prevent paint buildup.
If you notice any errors, touch them up while the paint is still fresh for the best results. This attention ensures your walls look polished and professional.
Step 6: Cleaning and Storing Your Stencils
Proper care extends the life of your tools when you design wall stencils. Immediately after use, wash mylar or plastic stencils with warm water and gentle soap to remove paint residue.
Dry stencils thoroughly and store them flat or hang them to prevent warping. For multi-room projects, rotate your stencils to distribute wear evenly.
Well-maintained stencils can be reused for years, making them a sustainable and cost-effective decorating solution.
Step 7: Troubleshooting Common Stenciling Issues
Even experienced DIYers encounter challenges as they design wall stencils. If you notice blurry edges or paint bleed, try using less paint and firmer pressure. For shifting stencils, reinforce with extra tape or a light spray adhesive.
Uneven paint coverage can be fixed by applying additional thin layers rather than overloading the brush. On textured walls, use thicker paint and press the stencil firmly for better results.
Address issues as soon as they arise to keep your project on track and achieve crisp, clean designs.
Step 8: Adding Final Touches and Sealing (Optional)
Once you design wall stencils and finish painting, enhance your work with hand-painted accents or metallic highlights for added dimension. For extra durability, consider sealing your stenciled wall with a clear topcoat.
Layer multiple stencil patterns for a dynamic, gallery-inspired look. Integrate your new wall art with framed prints or other decor elements to create a cohesive space.
The final touches make your stenciled wall a true reflection of your style and creativity.
Creative Stencil Ideas for 2026 Decor
Looking to refresh your home with the latest creative trends? The right approach to design wall stencils can completely transform any space, making it both stylish and unique. In 2026, stencil designs are more innovative than ever, offering something for every taste and room.
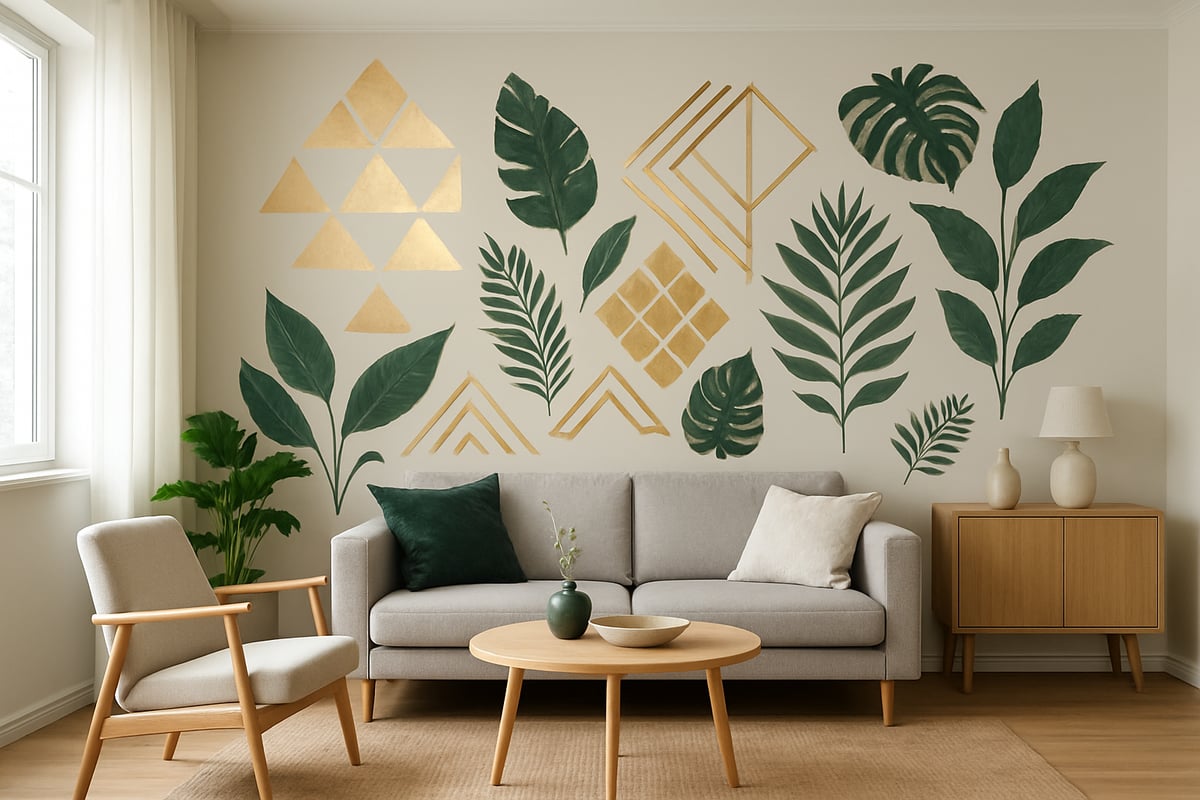
Geometric Patterns: Modern Minimalism and Bold Statements
Geometric patterns are leading the way in 2026 for those who want to design wall stencils with a modern twist. Scandinavian and Art Deco-inspired shapes, such as triangles, hexagons, and chevrons, are highly sought after. These patterns can be used to create striking feature walls or subtle accents, depending on your color choices.
- Combine several geometric stencils for a custom look.
- Try color blocking with contrasting shades for added depth.
- Use a minimalist palette or go bold with metallics and high-contrast tones.
For more inspiration on trending patterns and colors, check out the latest Wallpaper Trends 2026, which can help you select the perfect geometric motif for your project.
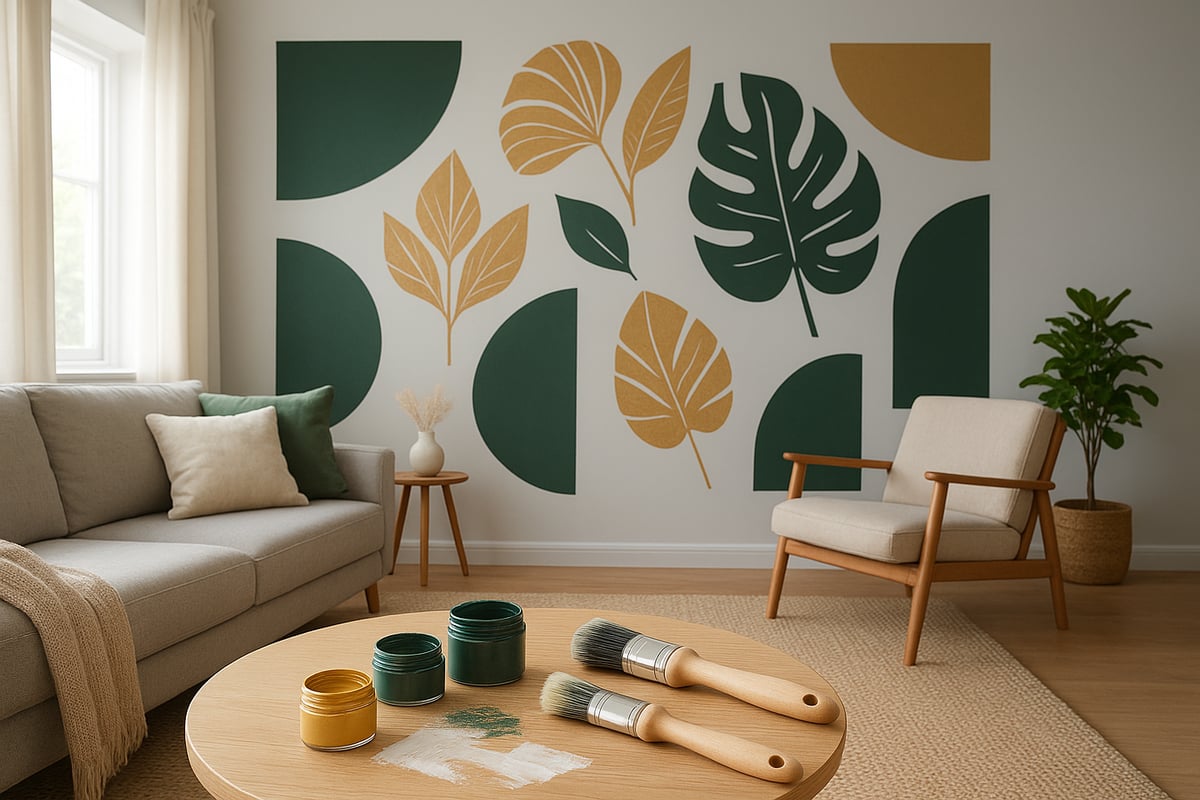
Nature-Inspired Stencils: Biophilic and Botanical Trends
Biophilic design remains a top choice for those wanting to design wall stencils that bring nature indoors. Botanical motifs such as ferns, palm leaves, and wildflowers are perfect for creating a calming, lush atmosphere. Layering multiple plant stencils in earthy greens and neutrals adds depth and visual interest.
- Use palm leaf stencils for sunrooms or bathrooms.
- Combine different plant shapes for a vibrant, organic effect.
- Opt for soft, natural palettes to evoke tranquility.
Nature-inspired stencils work especially well in bedrooms, bathrooms, and any space where relaxation is key.
Global and Cultural Patterns: Boho, Tribal, and Moroccan
Cultural influences are making a big impact on how people design wall stencils in 2026. Boho, tribal, and Moroccan patterns, such as mud cloth, mandalas, and tile-inspired motifs, are popular for creating an eclectic, globally-inspired look.
- Mix and match global patterns for a curated feel.
- Use rich colors and metallic accents for authenticity.
- Try a mud cloth design for a living room feature wall.
These patterns not only add visual interest but also tell a story, making your space truly one of a kind.
Playful and Whimsical: Kids’ Rooms and Creative Spaces
Design wall stencils can be a game changer in children's rooms and creative spaces. Playful options like stars, animals, and letters allow for personalized, interactive designs that grow with your child.
- Customize with names, quotes, or educational motifs.
- Choose safe, washable paints for easy maintenance.
- Create a starry night or animal adventure wall.
These stencils foster creativity and imagination, making them perfect for nurseries, playrooms, and even study areas.
Accent Walls, Borders, and Unexpected Applications
Think beyond plain walls when you design wall stencils. Stenciling can be used to create dramatic accent walls, subtle borders, or even surprise details on ceilings, stair risers, and furniture.
- Apply faux tile stencils for kitchen and bathroom backsplashes.
- Frame dining rooms with border stencils.
- Add personality to doors and closets with unique motifs.
Stenciling unexpected surfaces adds a layer of creativity and makes your decor stand out.
Mixing Stencils with Other Decor Elements
Integrating design wall stencils with other decor elements creates a cohesive, gallery-like effect. Layer stencils with framed art, posters, or decals for added dimension and visual flow.
- Pair botanical stencils with minimalist prints.
- Use color palettes that complement existing wall art.
- Mix murals, decals, and stencils for a custom gallery wall.
A thoughtful approach ensures your stenciled designs enhance, rather than compete with, your overall decor.
Pro Tips and Advanced Techniques for Stunning Results
Unlocking the full potential of how you design wall stencils means exploring advanced strategies. The following expert tips will elevate any project, whether you are working with intricate layers, bold custom pieces, or challenging surfaces. Maintain your stenciled masterpiece with confidence by following these professional insights.
Layering and Multi-Color Stenciling
Mastering how to design wall stencils with multiple colors adds remarkable depth and interest. Start by selecting a stencil pattern that accommodates different hues. Use painter’s tape to mask off areas, applying each color in thin layers and allowing them to dry between applications.
Try these techniques:
- Apply a base color, then overlay with a second stencil for shadows or highlights.
- Use gradient or ombre effects for a soft transition.
- Combine metallics with matte colors for dramatic contrast.
Specialty stencil brushes and sponges help with precise placement. For example, a mandala stencil with blended blues and golds can create a stunning focal point. Practice on a sample board to perfect your approach before moving to the wall.
Working with Large-Scale and Custom Stencils
When you design wall stencils for statement walls, large-scale and custom options provide maximum impact. Oversized stencils require secure placement, so use spray adhesive or extra painter’s tape to prevent shifting. Always measure and mark your wall for accurate pattern alignment.
Custom stencils let you personalize monograms, logos, or murals. You can source templates online or create your own for unique results. For inspiration and practical examples of large-format stencil art, explore wall mural inspiration and ideas.
Tips for success:
- Work in sections, repositioning the stencil after each repeat.
- Use a level or laser to keep patterns straight.
- Clean your stencil frequently to avoid paint build-up.
A large damask design in a dining room is a classic way to showcase custom stencil work.
Stenciling on Textured Walls and Challenging Surfaces
To successfully design wall stencils on textured drywall, brick, or concrete, adapt your technique. Choose thicker paints and firmer brushes for better coverage. Secure the stencil tightly to prevent seepage, and dab paint gently instead of rolling.
Solutions for tough surfaces:
- Use repositionable spray adhesive for extra hold.
- Test your approach on a small, hidden area first.
- For deeply textured walls, consider smaller or less intricate stencil designs.
Stenciling a faux brick pattern on a basement wall can transform the space. Overcome paint bleed by applying minimal paint and building up layers gradually.
Maintenance, Longevity, and Refreshing Your Stenciled Walls
After you design wall stencils and complete your project, regular care ensures lasting beauty. Clean stenciled surfaces with a soft, damp cloth. Avoid harsh chemicals that may fade colors.
For high-traffic areas, keep leftover paint for easy touch-ups. Refresh your design seasonally by adding new accent colors or layering additional patterns.
Maintenance tips:
- Apply a clear, water-based topcoat for extra protection.
- Inspect for chips or fading every few months.
- Protect from direct sunlight to prevent color loss.
Updating a mud cloth accent wall with fresh, on-trend hues keeps your decor current and vibrant.
Inspiring Real-Life Examples and Room-by-Room Applications
Transforming a home with design wall stencils is both achievable and inspiring. Let’s explore how stencils can make a difference in every room, from bold entryways to playful kids’ spaces. Each example highlights a unique approach, showing the versatility and creativity that design wall stencils offer.
Living Rooms and Entryways: First Impressions
First impressions matter, and living rooms are the most popular place to design wall stencils. Homeowners often choose bold damask or geometric patterns for a statement wall that greets guests with style. For a modern entryway, try an upscaled damask stencil paired with mirrors or plants. Layering stenciled walls with art or textured decor enhances depth and personality. For those who love eclectic or boho looks, pairing stenciled designs with pieces from the Boho and abstract poster collection creates a truly curated space. Mixing patterns and textures is key for a memorable entrance.
Bedrooms and Retreats: Creating Calm or Drama
Bedrooms benefit from soothing or dramatic design wall stencils. A popular choice is a mandala stencil as a headboard alternative, adding visual interest without overwhelming the space. Soft floral or abstract patterns help foster a restful atmosphere, while metallic finishes bring a touch of luxury. Accent walls behind beds naturally draw the eye and can be coordinated with textiles and lighting for a cohesive look. Consider layering stenciled elements with minimalist prints for a balanced, modern retreat. Stencil colors like soft blues or muted greens encourage relaxation and tranquility.
Kitchens and Dining Areas: Functional Art
Kitchens and dining areas are ideal for stenciling functional art. Faux tile stencils can mimic intricate Moroccan or Mediterranean designs above counters, offering a budget-friendly alternative to real tile. These patterns not only enhance style but are also easy to clean, making them practical for busy spaces. Food, drink, or botanical motifs are on trend in 2026, adding personality to nooks or breakfast bars. Design wall stencils can also define different zones in open-plan kitchens, helping to visually separate cooking and dining areas without physical barriers.
Bathrooms, Kids’ Spaces, and Beyond
Bathrooms and kids’ rooms are perfect canvases for creative design wall stencils. Use moisture-resistant paints and stencils for bathrooms, where small spaces benefit from bold, playful patterns. In children’s rooms, animal, star, and educational motifs can transform plain walls into imaginative backdrops. For more inspiration, explore Kids' room wall art ideas to complement stenciled designs with framed art or decals. Stenciling extends beyond traditional rooms, working wonders in laundry rooms, hallways, and even on doors, offering endless opportunities for customization.